lesson-3_webサイトにウォレット連携ボタンを実装しよう
🛍 ウォレットに接続するボタンをレンダリングする
WebアプリケーションからPhantom Walletにアプリケーションへの接続を促すため、connectWalletボタンを作成する必要があります。
web3の世界では、ウォレット接続ボタンは「サインアップ/ログイン」ボタンの役割を果たします。
pages/index.tsxファイルを下記の通り変更してください。
// index.tsx
import Head from "next/head";
import Image from "next/image";
import { useEffect } from "react";

import twitterLogo from "@/twitter-logo.svg";
import styles from "@/styles/Home.module.css";

// 定数の宣言
const TWITTER_HANDLE = "あなたのTwitterハンドル";
const TWITTER_LINK = `https://twitter.com/${TWITTER_HANDLE}`;

const Home = () => {
  const checkIfWalletIsConnected = async () => {
    try {
      const { solana } = window;

      if (solana && solana.isPhantom) {
        console.log("Phantom wallet found!");

        const response = await solana.connect({ onlyIfTrusted: true });
        console.log(
          "Connected with Public Key:",
          response.publicKey.toString()
        );
      } else {
        alert("Solana object not found! Get a Phantom Wallet 👻");
      }
    } catch (error) {
      console.error(error);
    }
  };

  /*
   * コードが壊れないように、下記関数を定義しましょう。
   * 下記はその関数の実装です。
   */
  const connectWallet = async () => {};

  /*
   * ユーザーがまだウォレットをアプリに接続していないときに
   * このUIを表示します。
   */
  const renderNotConnectedContainer = () => (
    <button
      className={`${styles.ctaButton} ${styles.connectWalletButton}`}
      onClick={connectWallet}
    >
      Connect to Wallet
    </button>
  );

  useEffect(() => {
    const onLoad = async () => {
      await checkIfWalletIsConnected();
    };
    onLoad();
  }, []);

  return (
    <>
      <Head>
        <title>Candy Drop</title>
        <meta name="description" content="Generated by create next app" />
        <meta name="viewport" content="width=device-width, initial-scale=1" />
        <link rel="icon" href="/favicon.ico" />
      </Head>
      <main className={styles.main}>
        <div className={styles.container}>
          <div>
            <p className={styles.header}>🍭 Candy Drop</p>
            <p className={styles.subText}>NFT drop machine with fair mint</p>
            {/* ウォレットに接続するボタンをここでレンダリングします */}
            {renderNotConnectedContainer()}
          </div>
          <div className={styles.footerContainer}>
            <Image
              alt="Twitter Logo"
              className={styles.twitterLogo}
              src={twitterLogo}
            />
            <a
              className={styles.footerText}
              href={TWITTER_LINK}
              target="_blank"
              rel="noreferrer"
            >{`built on @${TWITTER_HANDLE}`}</a>
          </div>
        </div>
      </main>
    </>
  );
};

export default Home;
これで、Webアプリケーションに「ウォレットに接続」というグラデーションボタンが表示されます。
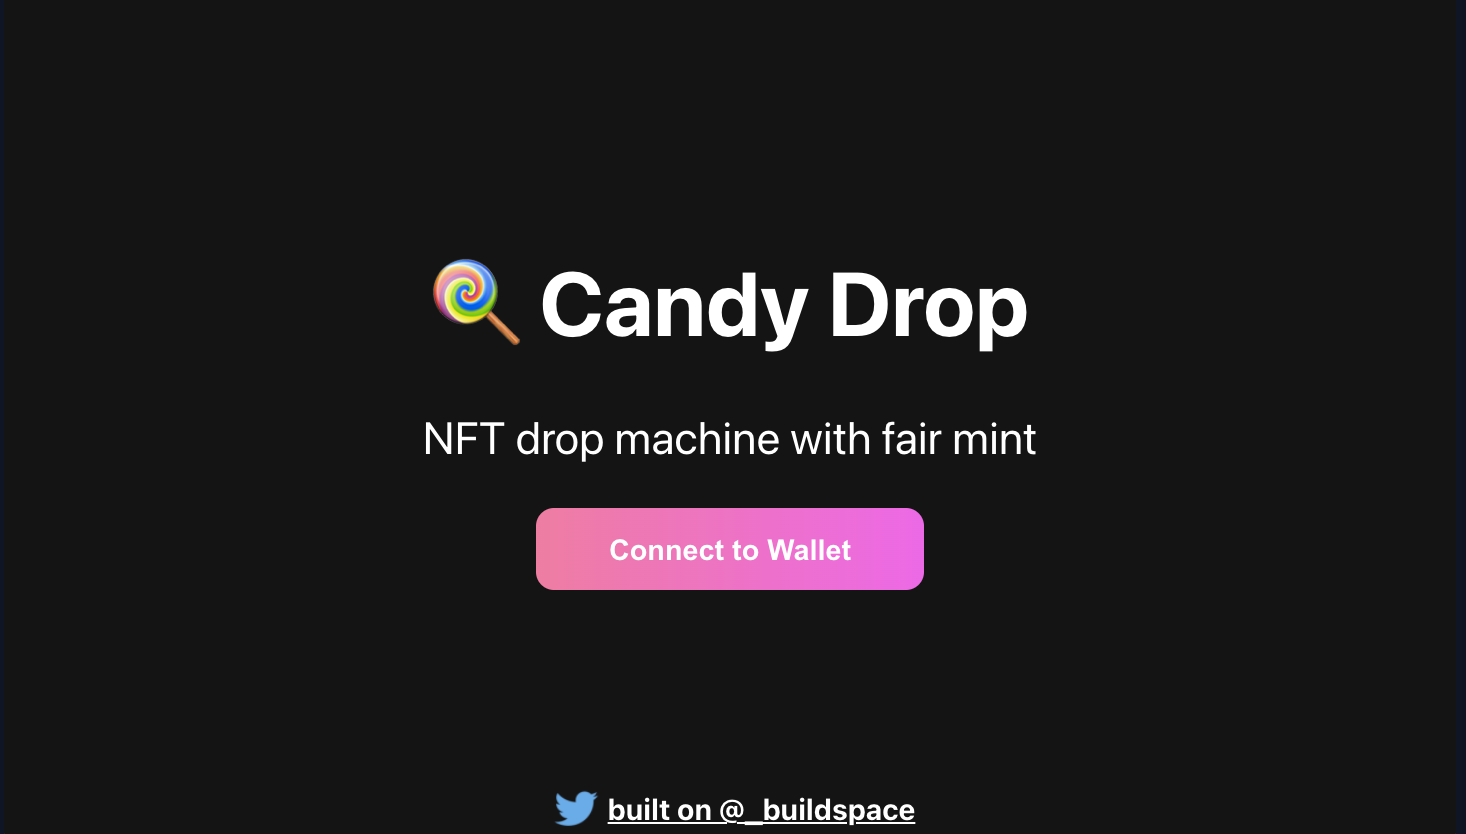
ユーザーがウォレットを Web アプリケーションに接続していない場合にのみ、Connect to Walletボタンが表示されます。
そこで、このウォレットのデータをReactのstateに格納してみてましょう。そうすればボタンを表示するかどうかを判断するフラグとしても使えます。
pages/index.tsxを修正します。
まずは下記のようにuseStateをコンポーネントにインポートする必要があります。
// index.tsx
import { useEffect, useState } from "react";
次に、 checkIfWalletIsConnected関数のすぐ上に進み、下記のstateの宣言を追加します。
// index.tsx
// State
const [walletAddress, setWalletAddress] = useState(null);
stateを保持する準備ができたので、ここでいくつかコードを更新しましょう。
index.tsxを下記の通り修正してください。
// index.tsx
import Head from "next/head";
import Image from "next/image";
import { useEffect, useState } from "react";

import twitterLogo from "@/twitter-logo.svg";
import styles from "@/styles/Home.module.css";

// Constants
const TWITTER_HANDLE = "あなたのTwitterハンドル";
const TWITTER_LINK = `https://twitter.com/${TWITTER_HANDLE}`;

const Home = () => {
  // State
  const [walletAddress, setWalletAddress] = useState(null);

  // Actions
  const checkIfWalletIsConnected = async () => {
    try {
      const { solana } = window;

      if (solana && solana.isPhantom) {
        console.log("Phantom wallet found!");

        const response = await solana.connect({ onlyIfTrusted: true });
        console.log(
          "Connected with Public Key:",
          response.publicKey.toString()
        );

        /*
         * ユーザーの公開鍵を後から使える状態にします。
         */
        setWalletAddress(response.publicKey.toString());
      } else {
        alert("Solana object not found! Get a Phantom Wallet 👻");
      }
    } catch (error) {
      console.error(error);
    }
  };

  const connectWallet = async () => {};

  const renderNotConnectedContainer = () => (
    <button
      className={`${styles.ctaButton} ${styles.connectWalletButton}`}
      onClick={connectWallet}
    >
      Connect to Wallet
    </button>
  );

  useEffect(() => {
    const onLoad = async () => {
      await checkIfWalletIsConnected();
    };
    onLoad();
  }, []);

  return (
    <>
      <Head>
        <title>Candy Drop</title>
        <meta name="description" content="Generated by create next app" />
        <meta name="viewport" content="width=device-width, initial-scale=1" />
        <link rel="icon" href="/favicon.ico" />
      </Head>
      <main className={styles.main}>
        <div className={styles.container}>
          <div>
            <p className={styles.header}>🍭 Candy Drop</p>
            <p className={styles.subText}>NFT drop machine with fair mint</p>
            {/* ウォレットアドレスを持っていない場合にのみ表示する条件を追加する */}
            {!walletAddress && renderNotConnectedContainer()}
          </div>
          <div className={styles.footerContainer}>
            <Image
              alt="Twitter Logo"
              className={styles.twitterLogo}
              src={twitterLogo}
            />
            <a
              className={styles.footerText}
              href={TWITTER_LINK}
              target="_blank"
              rel="noreferrer"
            >{`built on @${TWITTER_HANDLE}`}</a>
          </div>
        </div>
      </main>
    </>
  );
};

export default Home;
簡単に修正点を確認しましょう。
// index.tsx
const checkIfWalletIsConnected = async () => {
  try {
    const { solana } = window;

    if (solana && solana.isPhantom) {
      console.log("Phantom wallet found!");

      const response = await solana.connect({ onlyIfTrusted: true });
      console.log("Connected with Public Key:", response.publicKey.toString());

      /*
       * ユーザーの公開鍵を後から使える状態にします。
       */
      setWalletAddress(response.publicKey.toString());
    } else {
      alert("Solana object not found! Get a Phantom Wallet 👻");
    }
  } catch (error) {
    console.error(error);
  }
};
ファントムウォレットを接続するとユーザーのウォレットからデータを受信しました。
これで、後で使用できるように状態に保存してみましょう。
// index.tsx
{
  /* ウォレットアドレスを持っていない場合にのみ表示する条件を追加する */
}
{
  !walletAddress && renderNotConnectedContainer();
}
ここでは stateにwalletAddressが設定されていない場合にのみ、このrender関数を呼び出すように指示しています。
したがって、ユーザーがウォレットを接続していないことを意味するウォレットアドレスがない場合は、ウォレットを接続するためのボタンを表示します。
😅 実際にウォレット接続する
このままだとボタンをクリックしても何も起こりません。
connectWallet関数のロジックをコーディングします。
pages/index.tsxのconnectWallet関数を下記の通り修正しましょう。
// index.tsx
const connectWallet = async () => {
  const { solana } = window;

  if (solana) {
    const response = await solana.connect();
    console.log("Connected with Public Key:", response.publicKey.toString());
    setWalletAddress(response.publicKey.toString());
  }
};
ユーザーがウォレットを接続したい場合、solanaオブジェクトでconnect関数を呼び出して、ユーザーのウォレットでWebアプリケーションを承認を実施します。
そうすると、ユーザーのウォレット情報(ウォレットアドレスなど)にアクセスできます。
walletAddress関数を実装できたら、Webアプリケーションからウォレットを接続し、その後Connect to Walletボタンが表示されないか確認します。
ここからはブラウザで動作を確認します。Webアプリケーションを開き、Connect to Walletボタンをクリックしましょう。
まずはWebアプリケーション上のページを更新し、Connect to Walletボタンをクリックするとポップアップが表示されるので、指示に従って接続してください。
ボタンが消えることを確認できたら、Webアプリケーションを更新してみてください。
checkIfWalletIsConnected関数が呼び出され、ボタンがすぐに消えます。コンソールには公開鍵も出力されています。
基本的なUIとユーザー認証が実装できました。
次のセクションでは、Solanaプログラムを呼び出すために必要な関数を使用してすべてのセットアップを取得し、データを取得します。このままではWebアプリケーションが寂しいので機能を実装してみましょう。
⚠️: 注意
Phantom Wallet の設定画面(左上のメニュー → 設定をクリック)に、[信頼済みアプリ]があります。これを開くと、ウォレット接続している WEB アプリが表示されます。
ローカルで実行している場合は、
localhost:3000が表示されます。これを取り消すことで簡単に連携解除可能です。実際に連携解除しアプリを更新すると、
Connect to Walletボタンが表示されます。
🙋♂️ 質問する
ここまでの作業で何かわからないことがある場合は、Discordの#solanaで質問をしてください。
ヘルプをするときのフローが円滑になるので、エラーレポートには下記の3点を記載してください ✨
1. 質問が関連しているセクション番号とレッスン番号
2. 何をしようとしていたか
3. エラー文をコピー&ペースト
4. エラー画面のスクリーンショット
ぜひ、あなたのフロントエンドのスクリーンショットを#solanaに投稿してください 😊
あなたの成功をコミュニティで祝いましょう 🎉
次のレッスンでは、Solanaの開発環境を構築します!