Development Environment Setting
✅ Set Up Your Development Environment
Here is the overall structure of this project:
1. Create a Smart Contract
- Implement AMM logic on a smart contract so that users can swap tokens on-chain.
- Development will use a local
Ethereumchain.
2. Deploy the Smart Contract to the Blockchain
- Deploy the smart contract to
Avalanche'sFuji C-Chain. - People from all over the world will be able to access your smart contract.
- The blockchain acts as a server.
3. Build the Web Application (dApp)
- Users will be able to interact with your deployed smart contract via a website.
- Smart contract implementation + frontend user interface = Let’s complete the dApp 🎉
First, you’ll need to install node and yarn.
If you haven’t already, install them using the links below.
It’s recommended to install node v16.
Let’s start by creating a folder for this project. Navigate to the directory where you want to work, and run the following commands:
mkdir AVAX-AMM
cd AVAX-AMM
yarn init --private -y
A package.json file will be generated inside the AVAX-AMM directory.
AVAX-AMM
 └── package.json
Now, update the package.json file to the following:
{
  "name": "AVAX-AMM",
  "version": "1.0.0",
  "description": "AMM dApp",
  "private": true,
  "workspaces": {
    "packages": ["packages/*"]
  },
  "scripts": {
    "contract": "yarn workspace contract",
    "client": "yarn workspace client",
    "test": "yarn contract test"
  }
}
Let’s review the contents of the package.json file.
To create a monorepo, we’re using the Workspaces feature of the package manager.
This allows all packages(contract and client in this case)to be installed in one go with a single yarn install.
The workspaces section looks like this:
"workspaces": {
  "packages": [
    "packages/*"
  ]
},
And the commands to access each workspace package are defined like this:
"scripts": {
  "contract": "yarn workspace contract",
  "client": "yarn workspace client",
  "test": "yarn contract test"
}
Thanks to this setup, you can execute commands from the root directory without navigating into each package folder.
(However, each package must have a package.json file with the relevant commands defined. Otherwise, an error will occur. We’ll create those files later.)
yarn <package-name> <command>
Next, create a TypeScript configuration file tsconfig.json.
Since both the contract and client packages will use TypeScript, placing a tsconfig.json in the root allows us to define shared settings.
Ensure you’re in the AVAX-AMM directory, then run:
tsc --init
Check that tsconfig.json has been created. Leave the settings as default.
Now let’s create the folder structure to hold the workspace packages.
Make a packages directory, and inside it, create a contract directory. (We’ll create the client directory later when building the frontend.)
AVAX-AMM
 ├── package.json
+├── packages/
+│   └── contract/
 └── tsconfig.json
The contract directory is where you’ll build your smart contract.
Finally, create a .gitignore file in the root AVAX-AMM directory and add the following:
**/yarn-error.log*

# dependencies
**/node_modules

# misc
**/.DS_Store
At this point, your folder structure should look like this:
AVAX-AMM
 ├── .gitignore
 ├── package.json
 ├── packages/
 │   └── contract/
 └── tsconfig.json
Now the monorepo skeleton is complete!
✨ Install Hardhat
To quickly compileスマートコントラクトand run tests locally, we’ll use a tool called Hardhat.
- Hardhat lets you easily start a local Ethereum network for testing.
- Except that the “server” is the blockchain, Hardhat works like a local server.
Now, go into the packages/contract directory and run the following:
cd packages/contract
yarn init --private -y

# Install Hardhat
yarn add --dev hardhat@^2.11.2

# Install required plugins for smart contract development
yarn add --dev @nomicfoundation/hardhat-network-helpers@^1.0.0 @nomicfoundation/hardhat-chai-matchers@^1.0.0 @nomicfoundation/hardhat-toolbox@^2.0.0 @nomiclabs/hardhat-ethers@^2.0.0 @nomiclabs/hardhat-etherscan@^3.0.0 @types/chai@^4.2.0 @types/mocha@>=9.1.0 @typechain/ethers-v5@^10.1.0 @typechain/hardhat@^6.1.2 hardhat-gas-reporter@^1.0.8 solidity-coverage@^0.8.1 ts-node@^10.9.1 typechain@^8.1.0

yarn add dotenv@^16.0.2 @openzeppelin/contracts@^4.7.3
Here’s a brief overview of some key packages:
hardhat: Supports development usingSolidity.@openzeppelin/test-helpers: Useful when writing contract tests.dotenv: Used for setting environment variables, such as when deploying contracts.@openzeppelin/contracts: Provides secure smart contract implementations. A well-established framework from OpenZeppelin.
✍️: About
warningsWhen installing Hardhat, you might see vulnerability warnings. These warnings can generally be ignored. Every time you install a library, Yarn checks for known vulnerabilities.
👏 Start the Sample Project
Next, run Hardhat.
Make sure you’re in the packages/contract directory, then run:
npx hardhat init
When prompted in the terminal, respond as follows:
・What do you want to do? → Select “Create a TypeScript project”
・Hardhat project root: → Press “Enter” (sets the current directory)
・Do you want to add a .gitignore? (Y/n) → y
・Do you want to install this sample project's dependencies with npm? → n
(Example)
$ npx hardhat init
888 888 888 888 888
888 888 888 888 888
888 888 888 888 888
8888888888 8888b. 888d888 .d88888 88888b. 8888b. 888888
888 888 "88b 888P" d88" 888 888 "88b "88b 888
888 888 .d888888 888 888 888 888 888 .d888888 888
888 888 888 888 888 Y88b 888 888 888 888 888 Y88b.
888 888 "Y888888 888 "Y88888 888 888 "Y888888 "Y888
👷 Welcome to Hardhat v2.13.0 👷
✔ What do you want to do? · Create a TypeScript project
✔ Hardhat project root: · /any-directory/AVAX-AMM/packages/contract
✔ Do you want to add a .gitignore? (Y/n) · y
✔ Do you want to install this sample project's dependencies with npm (hardhat @nomicfoundation/hardhat-toolbox)? (Y/n) · n
You need to install these dependencies to run the sample project:
npm install --save-dev "hardhat@^2.12.6" "@nomicfoundation/hardhat-toolbox@^2.0.0"
✨ Project created ✨
See the README.md file for some example tasks you can run
Give Hardhat a star on Github if you're enjoying it! 💞✨
https://github.com/NomicFoundation/hardhat
⚠️: Note #1 If you’re using Git Bash on Windows, this step (HH1) might throw an error. Try using Windows CMD (Command Prompt) instead to install Hardhat.
Now your folder structure should look like this:
AVAX-AMM
 ├── .gitignore
 ├── package.json
 ├── packages/
 │   └── contract/
+│       ├── .gitignore
+│       ├── README.md
+│       ├── contracts/
+│       ├── hardhat.config.ts
+│       ├── package.json
+│       ├── scripts/
+│       ├── test/
+│       └── tsconfig.json
 └── tsconfig.json
Let’s update the package.json inside the contract directory as follows:
{
  "name": "contract",
  "version": "1.0.0",
-  "main": "index.js",
-  "license": "MIT",
  "private": true,
  "devDependencies": {
    "@nomicfoundation/hardhat-chai-matchers": "^1.0.0",
    "@nomicfoundation/hardhat-network-helpers": "^1.0.0",
    "@nomicfoundation/hardhat-toolbox": "^2.0.0",
    "@nomiclabs/hardhat-ethers": "^2.0.0",
    "@nomiclabs/hardhat-etherscan": "^3.0.0",
    "@typechain/ethers-v5": "^10.1.0",
    "@typechain/hardhat": "^6.1.2",
    "@types/chai": "^4.2.0",
    "@types/mocha": ">=9.1.0",
    "hardhat": "^2.11.2",
    "hardhat-gas-reporter": "^1.0.8",
    "solidity-coverage": "^0.8.1",
    "ts-node": "^10.9.1",
    "typechain": "^8.1.0"
  },
  "dependencies": {
    "@openzeppelin/contracts": "^4.7.3",
    "dotenv": "^16.0.2"
  },
+ "scripts": {
+   "deploy": "npx hardhat run scripts/deploy.ts --network fuji",
+   "cp": "yarn cp:typechain && yarn cp:artifact",
+   "cp:typechain": "cp -r typechain-types ../client/",
+   "cp:artifact": "cp artifacts/contracts/ERC20Tokens.sol/USDCToken.json artifacts/contracts/ERC20Tokens.sol/JOEToken.json artifacts/contracts/AMM.sol/AMM.json ../client/utils/",
+   "test": "npx hardhat test"
+ },
}
We removed unnecessary fields and added several commands under scripts to make testing and deployment easier. We’ve also added commands to copy files automatically to avoid manual mistakes.
⭐️ Run It
To make sure everything is working, run the following from the AVAX-AMM/ root:
yarn test
You should see something like this:
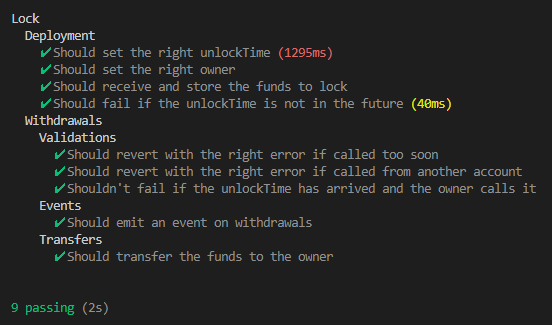
Whenever you run tests, use yarn test from the AVAX-AMM/ root.
Now, let’s clean up the folder.
First, delete Lock.js under the test directory:
- Move to the
testfolder:cd test - Delete
Lock.js:rm Lock.js
Then, delete Lock.sol under contracts using a similar method.
Be careful not to delete the entire folder.
☀️ About Hardhat’s Functionality
Hardhat performs the following steps:
1. Compiles スマートコントラクト written in Solidity to bytecode
- Bytecode is code that can be interpreted by machines.
2. Launches a “local Ethereum network” on your computer for testing
3. Deploys the compiled smart contract to the local Ethereum network
Check the address output in the terminal:
Greeter deployed to: 0x5FbDB2315678afecb367f032d93F642f64180aa3
This is the address where the smart contract has been deployed in the test Ethereum network.
🐊 Upload Your Source Code to GitHub
At the end of this project, we’ll deploy the app and need to upload the source code to GitHub.
Upload the entire AVAX-AMM folder.
This will be useful for future development as well, so let’s review the upload process now.
If you don’t yet have a GitHub account, create one using this guide.
If you’ve never uploaded to GitHub before, use this guide to create a new repository(name it anything),
then follow the instructions to upload via terminal.
The following is a sample of commands to run from the AVAX-AMM/ root:
$ git init
$ git add .
$ git commit -m "first commit"
$ git branch -M main
$ git remote add origin [your repository SSH URL]
$ git push -u origin main
✍️: Setting Up SSH
To clone or push to a GitHub repository, you need to generate an SSH key and register your public key with GitHub.
SSH (Secure Shell) allows secure remote control of machines. The key components are the private and public keys.
You generate a private/public key pair on your machine and give the public key to the server.
The private key must be kept secret, while the public key is shared.
For SSH setup on GitHub, see this guide.
🙋♂️ Ask Questions
If you’re confused or run into issues, ask in the #avalanche channel on Discord.
Please include the following in your error report to help others assist you:
1. Section and lesson number your question relates to
2. What you were trying to do
3. Copy & paste the error message
4. A screenshot of the error
Once your environment is ready, proceed to the next lesson 🎉