lesson-3_コンポーネントを作成しよう
📄 ファイルを追加しよう
このレッスンでは、Home画面、Search画面、ManageRooms画面に必要なコンポーネントを作成していきます。
以下のようなファイル構造になるよう、ディレクトリとファイルを追加しましょう。
  frontend/
  ├─ __mocks__/
  ├─ assets/
  │  ├─ css/
  │  ├─ img/
  │  └─ js/
  │     ├─ components/
+ │     │  ├─ AddRoom.js
+ │     │  ├─ FormDate.js
  │     │  ├─ NavBar.js
+ │     │  └─ Room.js
  │     ├─ near/
  │     └─ pages/
  │     ├─ GuestBookedList.js
  │     ├─ Home.js
  │     ├─ ManageBookings.js
  │     ├─ ManageRooms.js
  │     └─ Search.js
  ├─ App.js
  ├─ index.html
  └─ index.js
🗓 日付を入力するフォームを作成しよう
まずは、日付を入力できるフォームを実装します。
以下のコードを追加しましょう。
frontend/assets/js/components/FormDate.js
import { useState } from "react";
import Button from "react-bootstrap/Button";
import Col from "react-bootstrap/Col";
import Form from "react-bootstrap/Form";
import Row from "react-bootstrap/Row";
import { useNavigate } from "react-router-dom";

const FormDate = () => {
  const navigate = useNavigate();
  const [date, setDate] = useState("");

  const isFormFilled = () => date;
  return (
    <Form>
      <Row
        className="justify-content-center"
        style={{ marginTop: "50px", marginBottom: "50px" }}
      >
        <Col xs="auto">
          <Form.Control
            type="date"
            htmlSize="10"
            onChange={(e) => {
              setDate(e.target.value);
            }}
          />
        </Col>
        <Col xs="auto">
          <Button
            variant="secondary"
            // 検索する日付が入力されないとボタンを押せないように設定
            disabled={!isFormFilled()}
            // URLに入力された日付を入れて遷移先へ渡す
            onClick={() => navigate(`/search/${date}`)}
          >
            Search
          </Button>
        </Col>
      </Row>
    </Form>
  );
};

export default FormDate;
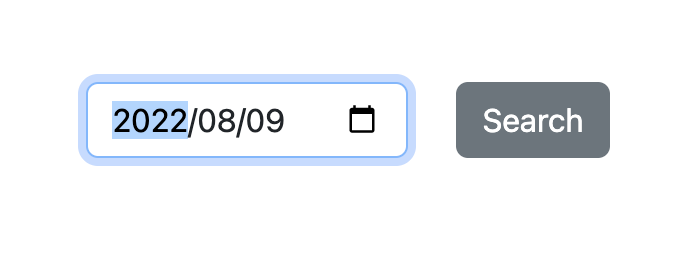
このようなフォームとボタンが実装されます。
追加した内容を見ていきましょう。
フォームの作成には、React BootstrapのFormを使用しました。type='date'を指定することで、日付を入力するフォームができます。
指定した日付で部屋を探せるように、フォームの横にSearch ボタン実装しました。
<Button
  variant="secondary"
  // 検索する日付が入力されないとボタンを押せないように設定
  disabled={!isFormFilled()}
  // URLに入力された日付を入れて遷移先へ渡す
  onClick={() => navigate(`/search/${date}`)}
>
  Search
</Button>
ボタンの作成には、React BootstrapのButtonを使用しました。disabled=条件を指定することで、ここでは日付が入力されないとボタンが押せないように設定しています。
Search ボタン を押すと、Search画面へ遷移するように指定しています。この時、入力された日付(date)を含めたパスを指定しています。この方法で遷移先のSearch.jsに日付を渡し、Search.jsではパスから日付を取得するように実装します。
⌨️ 部屋のデータを入力するフォームを作成しょう
次に、オーナーが部屋のデータを登録するためのフォームを実装します。 以下のコードを追加してください。
frontend/assets/js/components/AddRoom.js
import PropTypes from "prop-types";
import { useState } from "react";
import Button from "react-bootstrap/Button";
import Form from "react-bootstrap/Form";
import Modal from "react-bootstrap/Modal";

const AddRoom = ({ save }) => {
  // フォームで入力されたデータを取得・設定する
  const [name, setName] = useState("");
  const [beds, setBeds] = useState(0);
  const [image, setImage] = useState("");
  const [description, setDescription] = useState("");
  const [location, setLocation] = useState("");
  const [price, setPrice] = useState(0);
  // 全ての項目が入力されたか確認する
  const isFormFilled = () =>
    name && beds && image && description && location && price;

  // 入力フォームの表示・非表示を管理する
  const [show, setShow] = useState(false);
  const handleClose = () => setShow(false);
  const handleShow = () => setShow(true);

  return (
    <>
      <Button onClick={handleShow}>POST</Button>
      <Modal show={show} onHide={handleClose} centered>
        <Modal.Header closeButton>
          <Modal.Title>New Room</Modal.Title>
        </Modal.Header>
        <Form>
          <Modal.Body>
            {/* 部屋の名前 */}
            <Form.Group className="mb-3" controlId="inputName">
              <Form.Label>Name</Form.Label>
              <Form.Control
                type="text"
                onChange={(e) => {
                  setName(e.target.value);
                }}
                placeholder="Enter name of Room"
              />
            </Form.Group>
            {/* 部屋の画像 */}
            <Form.Group className="mb-3" controlId="inputUrl">
              <Form.Label>Image</Form.Label>
              <Form.Control
                type="text"
                placeholder="Image URL"
                onChange={(e) => {
                  setImage(e.target.value);
                }}
              />
            </Form.Group>
            {/* ベッドの数 */}
            <Form.Group className="mb-3" controlId="inputBeds">
              <Form.Label>Beds</Form.Label>
              <Form.Control
                type="number"
                min={1}
                onChange={(e) => {
                  setBeds(e.target.value);
                }}
                placeholder="Number of Beds"
              />
            </Form.Group>
            {/* 部屋の説明 */}
            <Form.Group className="mb-3" controlId="inputDescription">
              <Form.Label>Description</Form.Label>
              <Form.Control
                as="textarea"
                placeholder="Description"
                style={{ height: "80px" }}
                onChange={(e) => {
                  setDescription(e.target.value);
                }}
              />
            </Form.Group>
            {/* ホテルの場所 */}
            <Form.Group className="mb-3" controlId="inputLocation">
              <Form.Label>Location</Form.Label>
              <Form.Control
                type="text"
                placeholder="Location"
                onChange={(e) => {
                  setLocation(e.target.value);
                }}
              />
            </Form.Group>
            {/* 一泊の価格(NEAR) */}
            <Form.Group className="mb-3" controlId="inputPrice">
              <Form.Label>Price</Form.Label>
              <Form.Control
                type="number"
                min={0}
                placeholder="Price"
                onChange={(e) => {
                  setPrice(e.target.value);
                }}
              />
            </Form.Group>
          </Modal.Body>
        </Form>
        <Modal.Footer>
          <Button variant="outline-secondary" onClick={handleClose}>
            Close
          </Button>
          <Button
            variant="dark"
            disabled={!isFormFilled()}
            onClick={() => {
              save({
                name,
                image,
                beds,
                description,
                location,
                price,
              });
              handleClose();
            }}
          >
            Save room
          </Button>
        </Modal.Footer>
      </Modal>
    </>
  );
};

AddRoom.propTypes = {
  save: PropTypes.func.isRequired,
};

export default AddRoom;
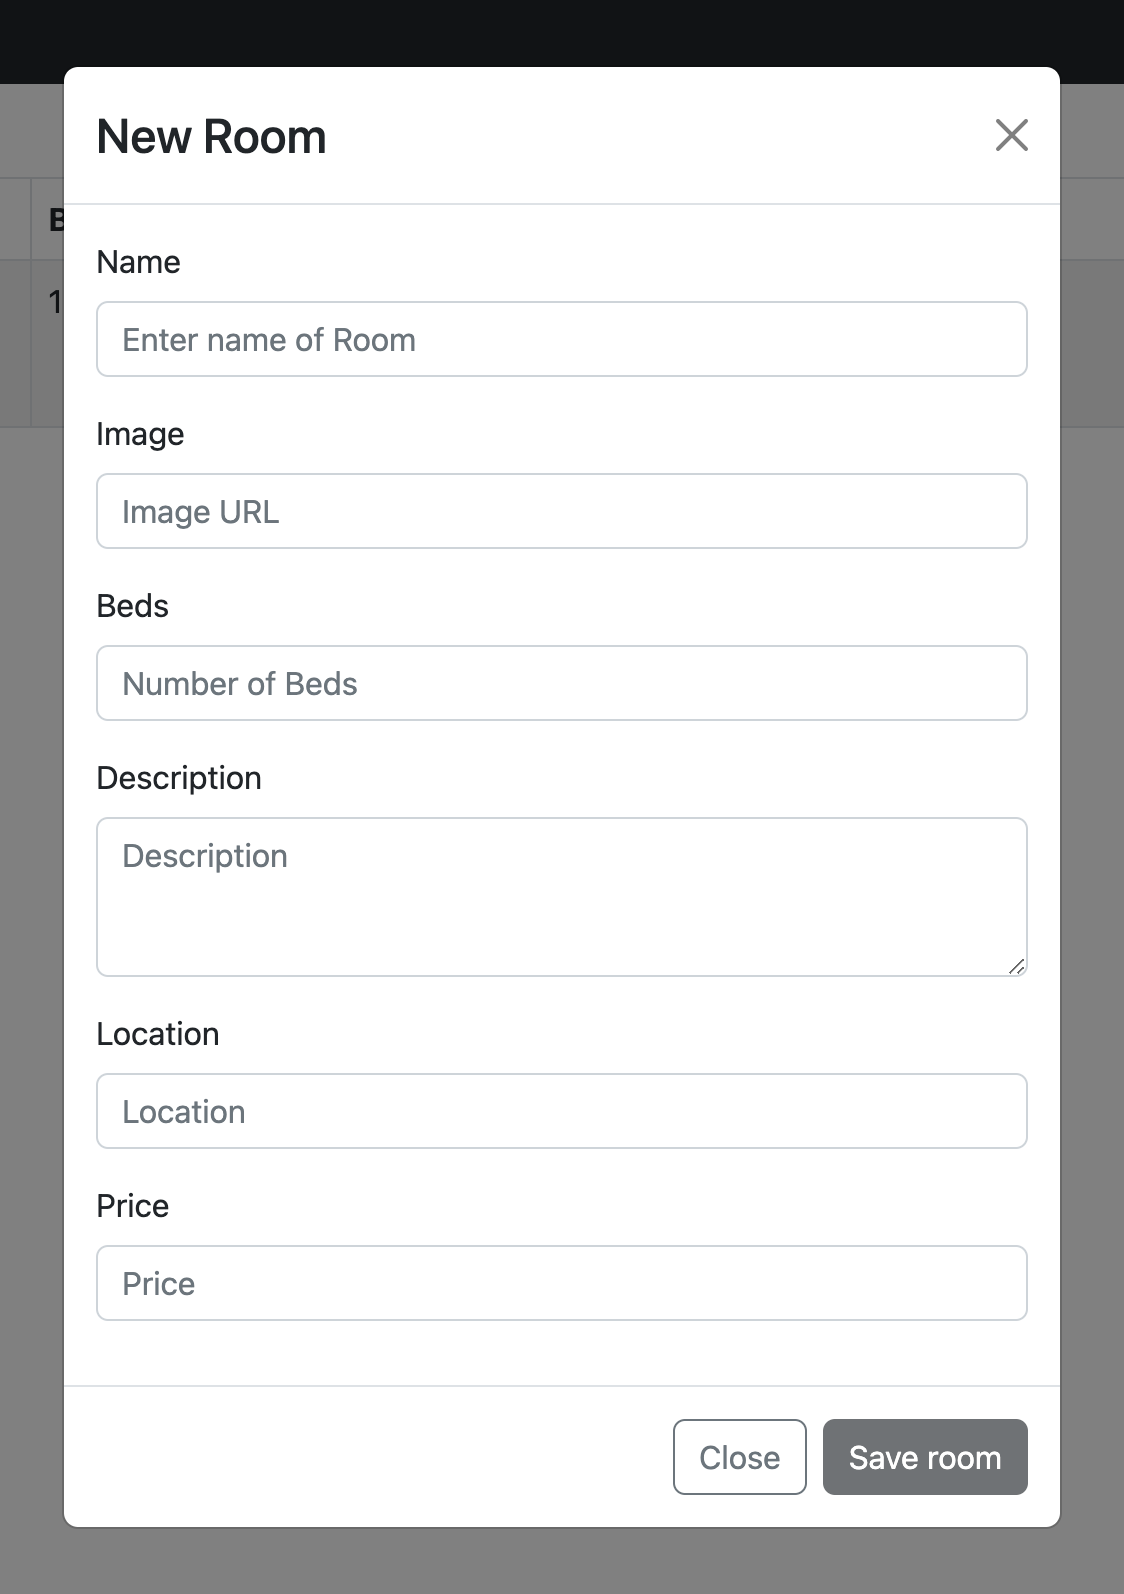
このようなフォームが実装されます。
追加した内容を見ていきましょう。
import PropTypes from 'prop-types';

const AddRoom = ({ save }) => {

  ...

};

AddRoom.propTypes = {
  save: PropTypes.func.isRequired,
};

export default AddRoom;
AddRoomコンポーネントには、引数が渡されます。受け取る引数が関数であることを定義するために、prop-typesを使用しています。これにより、誤って関数以外のものが渡された時に予期せぬエラーが生じるのを防ぎます。
次に、&&で全ての項目が入力されたかを確認する関数を定義しています。
const isFormFilled = () =>
  name && beds && image && description && location && price;
今回のフォームは、ボタンを押したら表示されるように作成します。 React BootstrapのModalsを使用しています。
表示・非表示はboolean型で制御しています。
  // 入力フォームの表示・非表示を管理する
  const [show, setShow] = useState(false);
  const handleClose = () => setShow(false);
  const handleShow = () => setShow(true);

  return (
    <>
      <Button onClick={handleShow}>POST</Button>
      <Modal show={show} onHide={handleClose} centered>
フォームの各項目に入力されたデータは、useStateを使い保存します。
全ての項目が入力されたら、Save room ボタンが押せるようになります。ボタンを押すと、引数として渡されていた``save`関数が実行されます。
<Button
  variant="dark"
  disabled={!isFormFilled()}
  onClick={() => {
    save({
      name,
      image,
      beds,
      image,
      description,
      location,
      price,
    });
    handleClose();
  }}
>
  Save room
</Button>
🧱 部屋を表示するグリッドレイアウトを作成しょう
最後に、Search画面で部屋の一覧を表示するためのレイアウトを作成します。
以下のコードを追加してください。
frontend/assets/js/components/Room.js
import { formatNearAmount } from "near-api-js/lib/utils/format";
import PropTypes from "prop-types";
import Button from "react-bootstrap/Button";
import Col from "react-bootstrap/Col";
import Image from "react-bootstrap/Image";
import Row from "react-bootstrap/Row";

const Room = ({ room, booking }) => {
  // roomオブジェクトからデータを取得
  const { room_id, owner_id, name, image, beds, description, location, price } =
    room;

  const handleBooking = () => {
    // `Search.js`のbookingに引数を渡す
    booking(room_id, price);
  };

  return (
    <Row style={{ padding: "20px" }}>
      <Col xs={1}></Col>
      <Col xs={2}>
        <Image src={image} alt={name} width="300" fluid />
      </Col>
      <Col xs={4}>
        <h4>{owner_id}</h4>
        <h4>{name}</h4>
        <p>{description}</p>
        <h5>{location}</h5>
      </Col>
      <Col xs={2}>
        <p>Beds</p>
        <h6>{beds}</h6>
      </Col>
      <Col xs={3}>
        <h6>1 night</h6>
        <Button
          variant="outline-dark"
          disabled={!window.accountId}
          onClick={handleBooking}
        >
          Book for {formatNearAmount(price)} NEAR
        </Button>
      </Col>
    </Row>
  );
};

// 引数の型を定義
Room.PropTypes = {
  room: PropTypes.instanceOf(Object).isRequired,
  booking: PropTypes.func.isRequired,
};

export default Room;
このようなレイアウトになります。

React BootstrapのRow、Col、Imageを使用しています。
追加した内容を見ていきましょう。
Room コンポーネントは、2つの引数を受け取ります。
room: 部屋のデータが入っています。booking: Book for x NEAR ボタンを押した時に実行される関数です。
const Room = ({ room, booking }) => {
  // roomオブジェクトからデータを取得
  const { room_id, owner_id, name, image, beds, description, location, price } =
    room;

  const handleBooking = () => {
    // `Search.js`のbookingに引数を渡す
    booking(room_id, price);
  };

  ...

};

// 引数の型を定義
Room.PropTypes = {
  room: PropTypes.instanceOf(Object).isRequired,
  booking: PropTypes.func.isRequired,
};

export default Room;
return文の中で、実際にレイアウトの設定を行なっています。
一番右に配置する予約ボタンの設定に、disabled={!window.accountId}を指定することで、NEAR Walletに接続されていないと押せないようにしています。
<Button
  variant="outline-dark"
  disabled={!window.accountId}
  onClick={handleBooking}
>
  Book for {formatNearAmount(price)} NEAR
</Button>
これでコンポーネントが準備できました!
🙋♂️ 質問する
ここまでの作業で何かわからないことがある場合は、Discordの#nearで質問をしてください。
ヘルプをするときのフローが円滑になるので、エラーレポートには下記の4点を記載してください ✨
1. 質問が関連しているセクション番号とレッスン番号
2. 何をしようとしていたか
3. エラー文をコピー&ペースト
4. エラー画面のスクリーンショット
次のレッスンに進み、各ページを完成させていきましょう!