lesson-2_ウォレットをWEBアプリに接続しよう
🌅 window.ethereumを設定する
Webア�プリケーション上で、ユーザーがイーサリアムネットワークと通信するためには、Webアプリケーションはユーザーのウォレット情報を取得する必要があります。
これから、あなたのWebアプリケーションにウォレットを接続したユーザーに、スマートコントラクトを呼び出す権限を付与する機能を実装していきます。
- これは、Webサイトへの認証機能です。
それでは、ETH-NFT-Collection/packages/clientディレクトリ下のファイルを編集していきましょう。
下記のように、App.jsの中身を更新します。
App.jsはあなたのWebアプリケーションのフロントエンド機能を果たします。
// App.js
import React, { useEffect } from "react";
import "./styles/App.css";
import twitterLogo from "./assets/twitter-logo.svg";
// Constantsを宣言する: constとは値書き換えを禁止した変数を宣言する方法です。
const TWITTER_HANDLE = "あなたのTwitterのハンドルネームを貼り付けてください";
const TWITTER_LINK = `https://twitter.com/${TWITTER_HANDLE}`;

const App = () => {
  const checkIfWalletIsConnected = () => {
    /*
     * ユーザーがMetaMaskを持っているか確認します。
     */
    const { ethereum } = window;
    if (!ethereum) {
      console.log("Make sure you have MetaMask!");
      return;
    } else {
      console.log("We have the ethereum object", ethereum);
    }
  };
  // renderNotConnectedContainer メソッドを定義します。
  const renderNotConnectedContainer = () => (
    <button className="cta-button connect-wallet-button">
      Connect to Wallet
    </button>
  );
  /*
   * ページがロードされたときに useEffect()内の関数が呼び出されます。
   */
  useEffect(() => {
    checkIfWalletIsConnected();
  }, []);
  return (
    <div className="App">
      <div className="container">
        <div className="header-container">
          <p className="header gradient-text">My NFT Collection</p>
          <p className="sub-text">あなただけの特別な NFT を Mint しよう💫</p>
          {/* メソッドを追加します */}
          {renderNotConnectedContainer()}
        </div>
        <div className="footer-container">
          <img alt="Twitter Logo" className="twitter-logo" src={twitterLogo} />
          <a
            className="footer-text"
            href={TWITTER_LINK}
            target="_blank"
            rel="noreferrer"
          >{`built on @${TWITTER_HANDLE}`}</a>
        </div>
      </div>
    </div>
  );
};
export default App;
新しく追加したコードを見ていきましょう。
// App.js
// ユーザーがMetaMaskを持っているか確認します。
const { ethereum } = window;
window.ethereumはMetaMaskが提供するAPIです。
詳しく知りたい方は こちら を参照してみてください。
公式のドキュメント こちら です。
🦊 ユーザーアカウントにアクセスできるか確認する
window.ethereumは、あなたのWebサイトを訪問したユーザーがMetaMaskを持っているか確認し、結果をConsole logに出力します。
プロジェクトのルートディレクトリ(ETH-NFT-Collection/)にいることを確認し、下記を実行してみましょう。
yarn client start
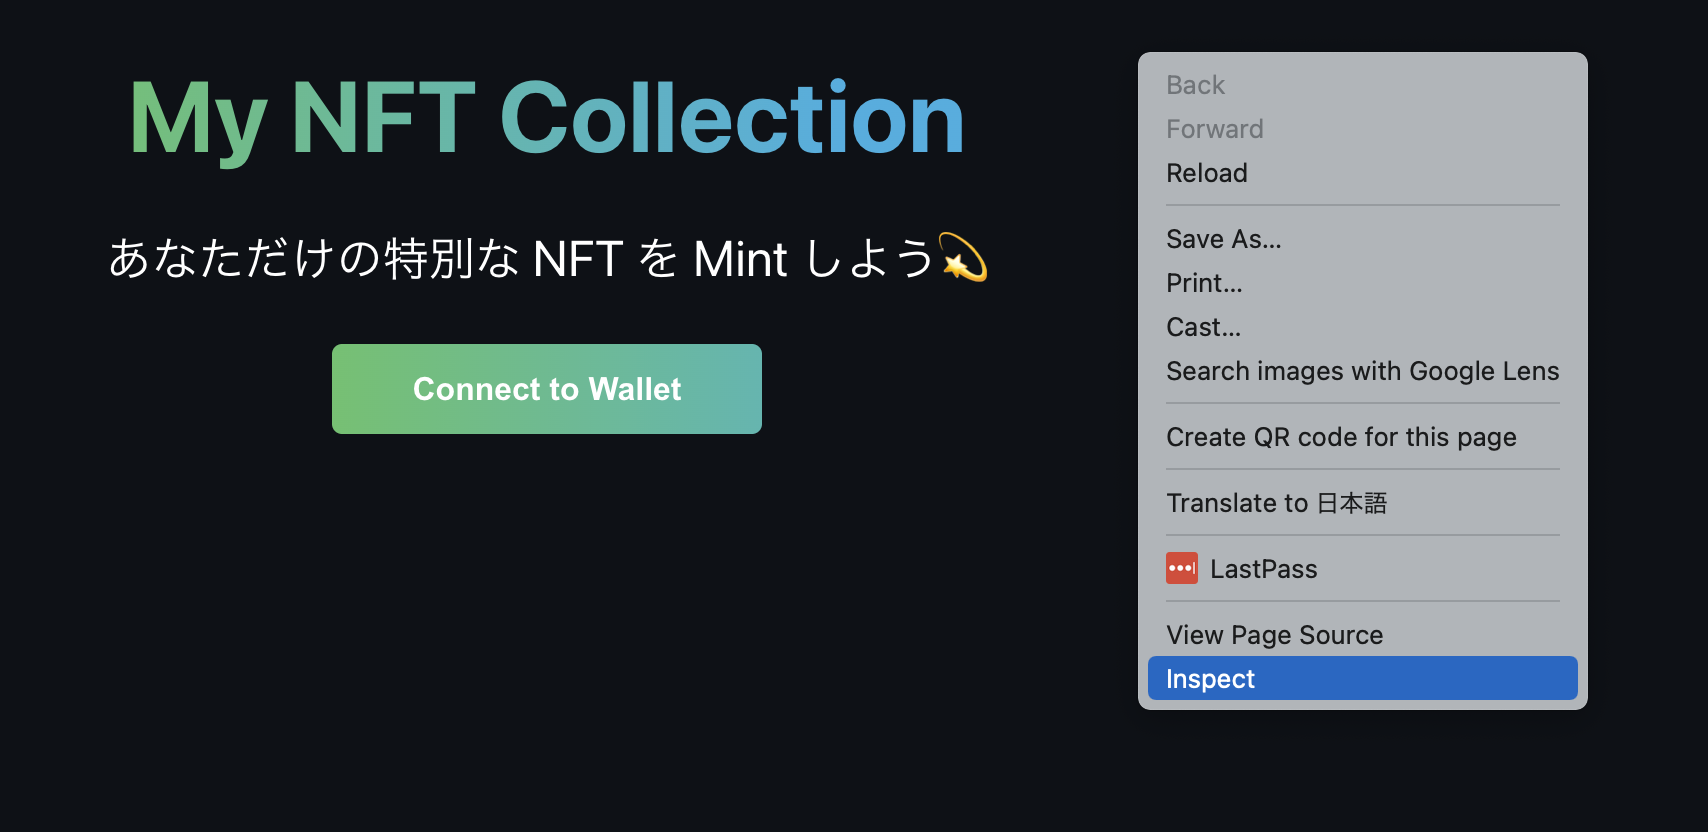
ローカルサーバーでWebサイトを立ち上げたら、サイトの上で右クリックを行い、Inspectを選択します。

次に、Consoleを選択し、出力結果を確認してみましょう。

ConsoleにWe have the ethereum objectと表示されているでしょうか?
- これは、
window.ethereumが、このWebサイトを訪問したユーザー(ここでいうあなた)がMetaMaskを持っていることを確認したことを示しています。
次に、Webサイトがユーザーのウォレットにアクセスする権限があるか確認します。
- アクセスできたら、スマートコントラクトを呼び出すことができます。
これから、ユーザー自身が承認したWebサイトにウォレットのアクセス権限を与えるコードを書いていきます。
- これは、ユーザーのログイン機能です。
以下の通り、App.jsを修正してください。
// App.js
// useEffect と useState 関数を React.js からインポートしています。
import React, { useEffect, useState } from "react";
import "./styles/App.css";
import twitterLogo from "./assets/twitter-logo.svg";
// Constantsを宣言する: constとは値書き換えを禁止した変数を宣言する方法です。
const TWITTER_HANDLE = "あなたのTwitterのハンドルネームを貼り付けてください";
const TWITTER_LINK = `https://twitter.com/${TWITTER_HANDLE}`;
const App = () => {
/*
* ユーザーのウォレットアドレスを格納するために使用する状態変数を�定義します。
*/
const [currentAccount, setCurrentAccount] = useState("");
/*この段階でcurrentAccountの中身は空*/
console.log("currentAccount: ", currentAccount);
/*
* ユーザーが認証可能なウォレットアドレスを持っているか確認します。
*/
const checkIfWalletIsConnected = async () => {
const { ethereum } = window;
if (!ethereum) {
console.log("Make sure you have MetaMask!");
return;
} else {
console.log("We have the ethereum object", ethereum);
}
/*
// ユーザーが認証可能なウォレットアドレスを持っている場合は、
// ユーザーに対してウォレットへのアクセス許可を求める。
// 許可されれば、ユーザーの最初のウォレットアドレスを
// accounts に格納する。
*/
const accounts = await ethereum.request({ method: "eth_accounts" });
if (accounts.length !== 0) {
const account = accounts[0];
console.log("Found an authorized account:", account);
setCurrentAccount(account);
} else {
console.log("No authorized account found");
}
};
// renderNotConnectedContainer メソッドを定義します。
const renderNotConnectedContainer = () => (
<button className="cta-button connect-wallet-button">
Connect to Wallet
</button>
);
/*
* ページがロードされたときに useEffect()内の関数が呼び出されます。
*/
useEffect(() => {
checkIfWalletIsConnected();
}, []);
return (
<div className="App">
<div className="container">
<div className="header-container">
<p className="header gradient-text">My NFT Collection</p>
<p className="sub-text">あなただけの特別な NFT を Mint しよう💫</p>
{/* メソッドを追加します */}
{renderNotConnectedContainer()}
</div>
<div className="footer-container">
<img alt="Twitter Logo" className="twitter-logo" src={twitterLogo} />
<a
className="footer-text"
href={TWITTER_LINK}
target="_blank"
rel="noreferrer"
>{`built on @${TWITTER_HANDLE}`}</a>
</div>
</div>
</div>
);
};
export default App;
新しく追加したコードを見ていきましょう。
// App.js
// ユーザーのウォレットアドレスを格納するために使用する状態変数を定義します。
const [currentAccount, setCurrentAccount] = useState("");
/*この段階でcurrentAccountの中身は空*/
console.log("currentAccount: ", currentAccount);
アクセス可能なアカウントを検出した後、currentAccountにユーザーのウォレットアカウント(0x...)の値が入ります。
以下でcurrentAccountを更新しています。
// App.js
// accountsにWEBサイトを訪れたユーザーのウォレットアカウントを格納する(複数持っている場合も加味、よって account's' と変数を定義している)
const accounts = await ethereum.request({ method: "eth_accounts" });
// もしアカウントが一つでも存在したら、以下を実行。
if (accounts.length !== 0) {
  // accountという変数にユーザーの1つ目(=Javascriptでいう0番目)のアドレスを格納
  const account = accounts[0];
  console.log("Found an authorized account:", account);
  // currentAccountにユーザーのアカウントアドレスを格納
  setCurrentAccount(account);
} else {
  console.log("No authorized account found");
}
この処理のおかげで、ユーザーがウォレットに複数のアカウントを持っている場合でも、プログラムはユーザーの1番目のアカウントアドレスを取得できます。
👛 ウォレット接続ボタンを作成する
次に、connectWalletボタンを作成していきます。
下記の通��りApp.jsを更新していきましょう。
// App.js
// useEffect と useState 関数を React.js からインポートしています。
import React, { useEffect, useState } from "react";
import "./styles/App.css";
import twitterLogo from "./assets/twitter-logo.svg";
// Constantsを宣言する: constとは値書き換えを禁止した変数を宣言する方法です。
const TWITTER_HANDLE = "あなたのTwitterのハンドルネームを貼り付けてください";
const TWITTER_LINK = `https://twitter.com/${TWITTER_HANDLE}`;

const App = () => {
  /*
   * ユーザーのウォレットアドレスを格納するために使用する状態変数を定義します。
   */
  const [currentAccount, setCurrentAccount] = useState("");
  /*この段階でcurrentAccountの中身は空*/
  console.log("currentAccount: ", currentAccount);
  /*
   * ユーザーが認証可能なウォレットアドレスを持っているか確認します。
   */
  const checkIfWalletIsConnected = async () => {
    const { ethereum } = window;
    if (!ethereum) {
      console.log("Make sure you have MetaMask!");
      return;
    } else {
      console.log("We have the ethereum object", ethereum);
    }
    /* ユーザーが認証可能なウォレットアドレスを持っている場合は、
     * ユーザーに対してウォレットへのアクセス許可を求める。
     * 許可されれば、ユーザーの最初のウォレットアドレスを
     * accounts に格納する。
     */
    const accounts = await ethereum.request({ method: "eth_accounts" });

    if (accounts.length !== 0) {
      const account = accounts[0];
      console.log("Found an authorized account:", account);
      setCurrentAccount(account);
    } else {
      console.log("No authorized account found");
    }
  };

  /*
   * connectWallet メソッドを実装します。
   */
  const connectWallet = async () => {
    try {
      const { ethereum } = window;
      if (!ethereum) {
        alert("Get MetaMask!");
        return;
      }
      /*
       * ウォレットアドレスに対してアクセスをリクエストしています。
       */
      const accounts = await ethereum.request({
        method: "eth_requestAccounts",
      });
      console.log("Connected", accounts[0]);
      /*
       * ウォレットアドレスを currentAccount に紐付けます。
       */
      setCurrentAccount(accounts[0]);
    } catch (error) {
      console.log(error);
    }
  };

  // renderNotConnectedContainer メソッドを定義します。
  const renderNotConnectedContainer = () => (
    <button
      onClick={connectWallet}
      className="cta-button connect-wallet-button"
    >
      Connect to Wallet
    </button>
  );
  /*
   * ページがロードされたときに useEffect()内の関数が呼び出されます。
   */
  useEffect(() => {
    checkIfWalletIsConnected();
  }, []);
  return (
    <div className="App">
      <div className="container">
        <div className="header-container">
          <p className="header gradient-text">My NFT Collection</p>
          <p className="sub-text">あなただけの特別な NFT を Mint しよう💫</p>
          {/*条件付きレンダリングを追加しました
          // すでに接続されている場合は、
          // Connect to Walletを表示しないようにします。*/}
          {currentAccount === "" ? (
            renderNotConnectedContainer()
          ) : (
            <button onClick={null} className="cta-button connect-wallet-button">
              Mint NFT
            </button>
          )}
        </div>
        <div className="footer-container">
          <img alt="Twitter Logo" className="twitter-logo" src={twitterLogo} />
          <a
            className="footer-text"
            href={TWITTER_LINK}
            target="_blank"
            rel="noreferrer"
          >{`built on @${TWITTER_HANDLE}`}</a>
        </div>
      </div>
    </div>
  );
};
export default App;
ここで実装した機能は以下の3つです。
1 . connectWalletメソッドを実装
// App.js
const connectWallet = async () => {
  try {
    // ユーザーが認証可能なウォレットアドレスを持っているか確認
    const { ethereum } = window;
    if (!ethereum) {
      alert("Get MetaMask!");
      return;
    }
    // 持っている場合は、ユーザーに対してウォレットへのアクセス許可を求める。許可されれば、ユーザーの最初のウォレットアドレスを currentAccount に格納する。
    const accounts = await ethereum.request({ method: "eth_requestAccounts" });
    console.log("Connected: ", accounts[0]);
    setCurrentAccount(accounts[0]);
  } catch (error) {
    console.log(error);
  }
};
eth_requestAccountsメソッドを使用することで、MetaMaskからユーザーにウォレットへのアクセスを許可するよう呼びかけることができます。
2 . renderNotConnectedContainerメソッドを実装
// App.js
const renderNotConnectedContainer = () => (
  <button onClick={connectWallet} className="cta-button connect-wallet-button">
    Connect to Wallet
  </button>
);
renderNotConnectedContainerメソッドによって、ユーザーのウォレットアドレスが、Webアプリケーションと紐づいていない場合は、「Connect to Wallet」のボタンがフロントエンドに表示されます。
3 . renderNotConnectedContainerメソッドを使った条件付きレンダリング
// App.js
{
  /*条件付きレンダリングを追加しました。*/
}
{
  currentAccount === "" ? (
    renderNotConnectedContainer()
  ) : (
    <button onClick={null} className="cta-button connect-wallet-button">
      Mint NFT
    </button>
  );
}
ここでは、条件付きレンダリングを実装しています。
currentAccount === ""は、currentAccountにユーザーのウォレットアドレスが紐づいているかどうか判定しています。
条件付きレンダリングは、下記のように実行されます。
{ currentAccount === "" ? ( currentAccount にアドレスが紐づいてなければ、A を実行 ) : ( currentAccount にアドレスが紐づいれば B を実行 )}
App.jsの場合、A並ばは、renderNotConnectedContainer()を実行し、Bならば、Mint NFTボタンをフロントエンドに反映させています。
条件付きレンダリングについて詳しくは こちら を参照してください。
🌐 ウォレットコネクトのテストを実行する
上記のコードをすべてApp.jsに反映させたら、ターミナル上で下記を実行しましょう。
yarn client start
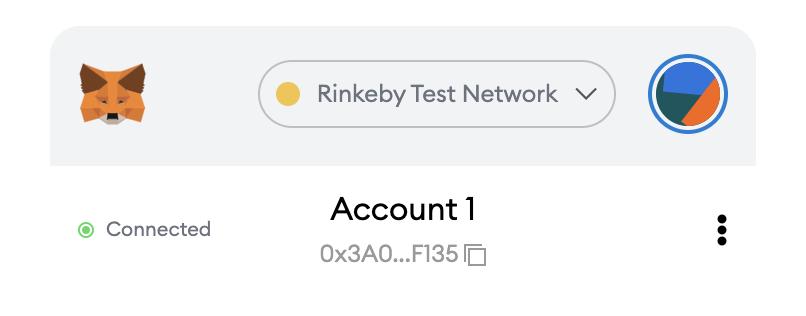
ローカルサーバーでWebサイトを立ち上げたら、MetaMaskのプラグインをクリックし、あなたのウォレットアドレスの接続状況を確認しましょう。
もし、下図のようにConnectedと表示されている場合は、Connectedの文字をクリックします。

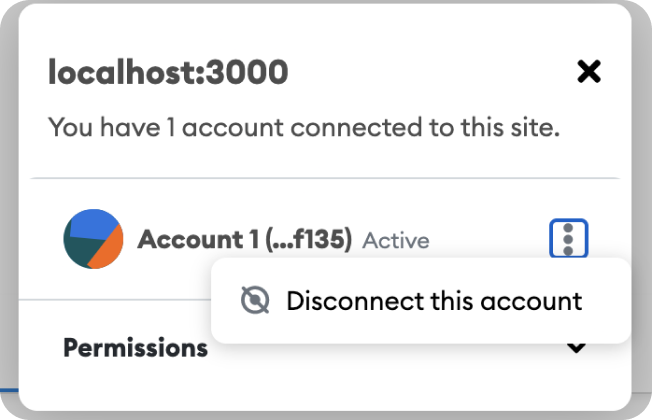
そこで、Webサイトとあなたのウォレットアドレスの接続を一度解除します。
Disconnect this accountを選択してください。

次にローカルサーバーにホストされているあなたのWebサイトをリフレッシュしてボタンの表示を確認してください。
- ウォレット接続用のボタンが、
Connect Walletと表示されていれば成功です。
次に、右クリック → Inspectを選択し、Consoleを立ち上げましょう。下図のように、No authorized account foundと出力されていれば成功です。

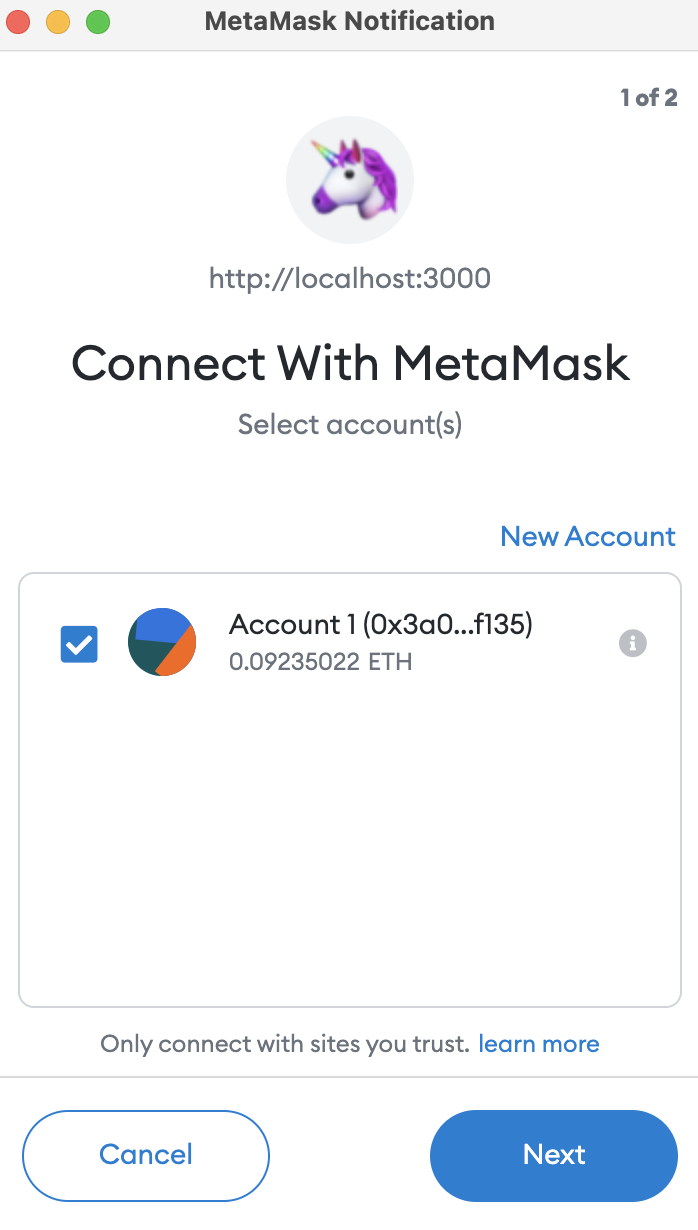
では、Connect Walletボタンを押してみましょう。
下図のようにMetaMaskからウォ��レット接続を求められますので、承認してください。

MetaMaskの承認が終わると、ウォレット接続ボタンの表示がMint NFTに変更されているはずです。
下記のように、Consoleにも、接続されたウォレットアドレスが、currentAccountとして出力されていることを確認してください。
Connected 0x3a0a49fb3cf930e599f0fa7abe554dc18bd1f135
currentAccount:  0x3a0a49fb3cf930e599f0fa7abe554dc18bd1f135
ターミナルを閉じるときは、以下のコマンドが使えます ✍️
- Mac:
ctrl + c - Windows:
ctrl + shift + w
🙋♂️ 質問する
ここまでの作業で何かわからないことがある場合は、Discordの#ethereumで質問をしてください。
ヘルプをするときのフローが円滑になるので、エラーレポートには下記の3点を記載してください ✨
1. 質問が関連しているセクション番号とレッスン番号
2. 何をしようとしていたか
3. エラー文をコピー&ペースト
4. エラー画面のスクリーンショット
ウォレット接続機能が完成したら、次のレッスンに進みましょう 🎉