lesson-3_フロントエンドとウォレットを連携しよう
🦊 MetaMask をダウンロードする
ウォレットをダウンロードしましょう。
このプロジェクトではMetaMaskを使用します。
- こちら からブラウザの拡張機能をダウンロードし、MetaMaskウォレットをあなたのブラウザに設定します。
✍️: MetaMask が必要な理由 ユーザーが、スマートコントラクトを呼び出すとき、本人のアドレスと秘密鍵を備えたウォレットが必要となります。 これは、認証作業のようなものです。
MetaMaskを設定できたら、Avalancheのテストネットワークを追加しましょう。
MetaMaskの上部のネットワークタブを開き、Add Networkをクリックします。
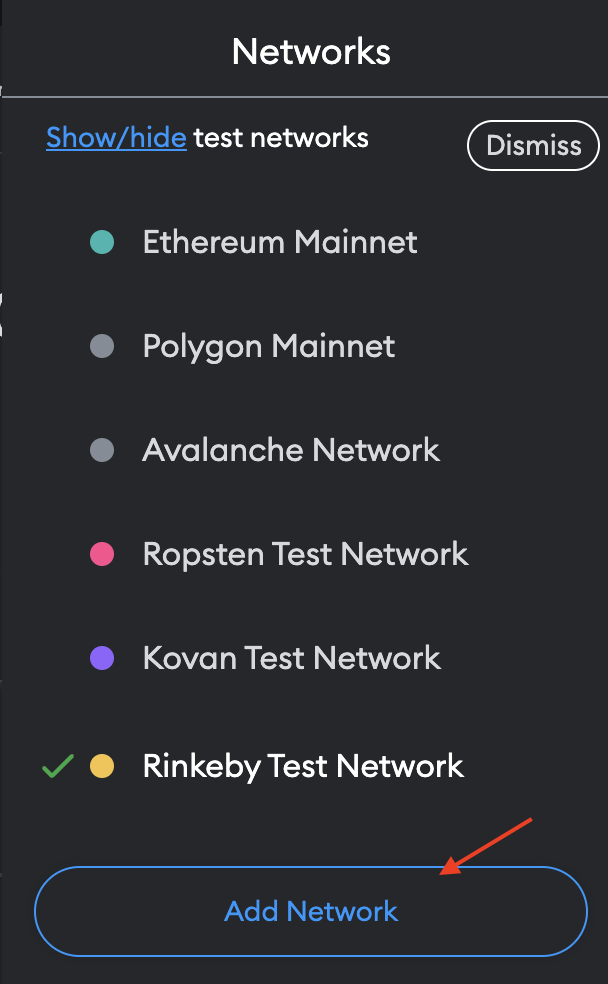
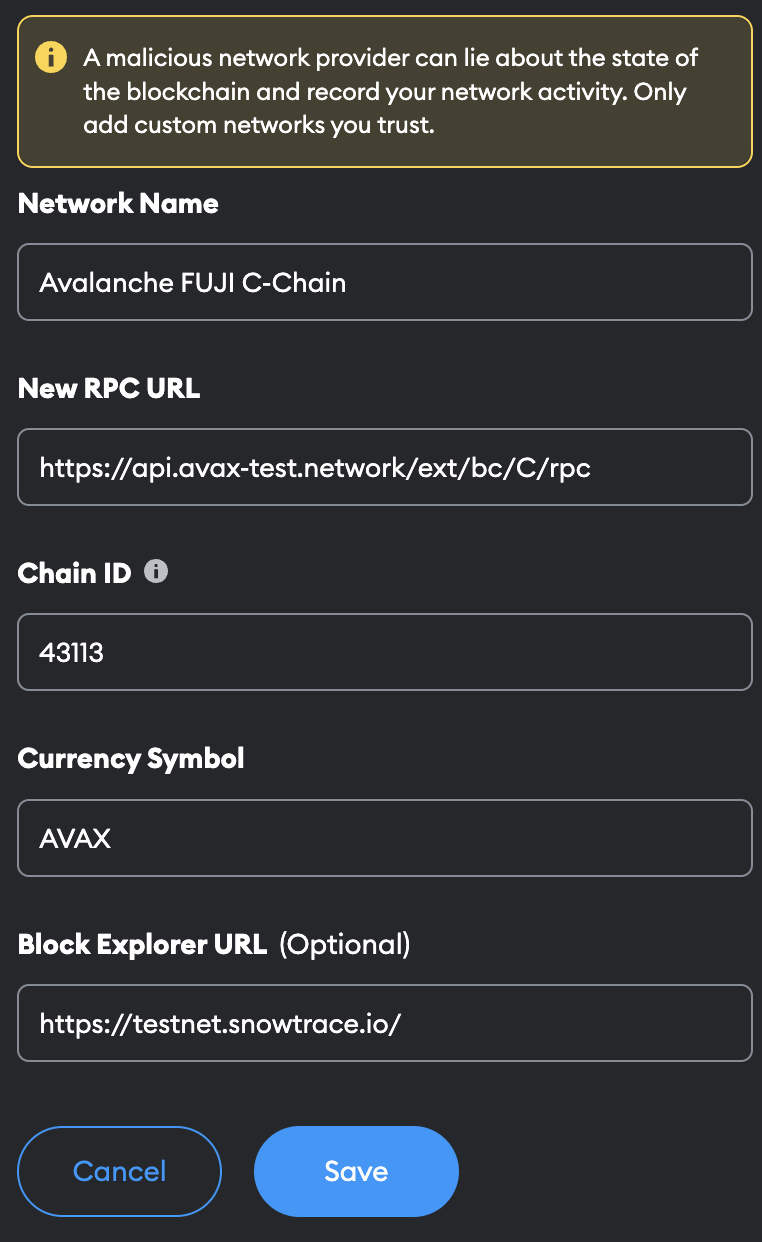
開いた設定ページ内で以下の情報を入力して保存をクリックしましょう。
Network Name: Avalanche FUJI C-Chain
New RPC URL: https://api.avax-test.network/ext/bc/C/rpc
ChainID: 43113
Symbol: AVAX
Explorer: https://testnet.snowtrace.io/
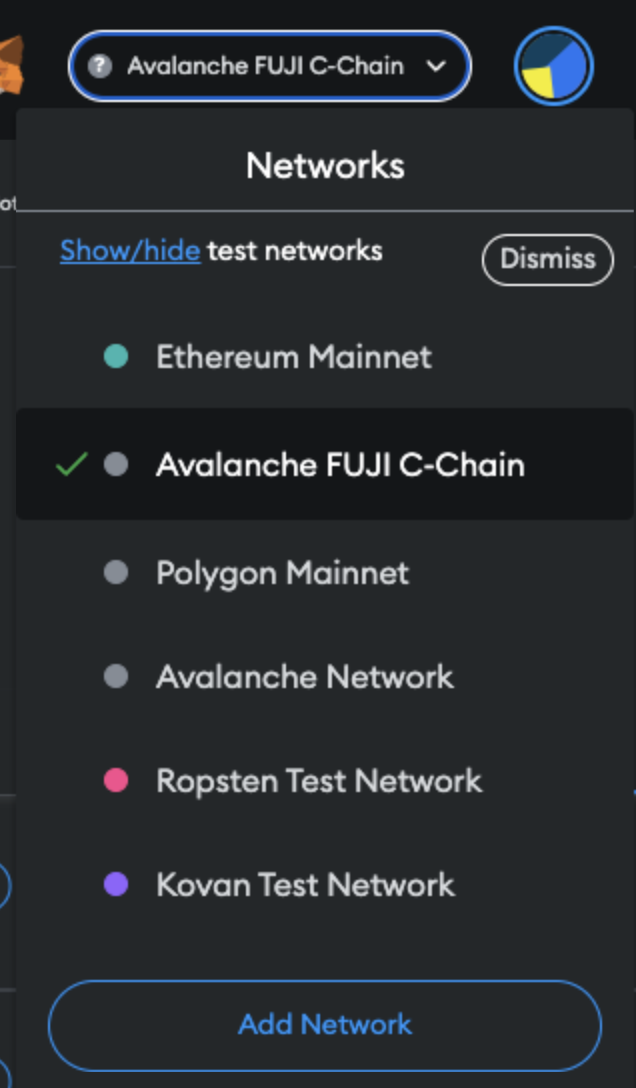
登録が成功したらAvalancheのテストネットであるAvalanche Fuji C-Chainが選択できるはずです。
🚰 Faucetを利用してAVAXをもらう
続いて、Avalanche FaucetでAVAXを取得します。
テストネットでのみ使用できる偽のAVAXです。
上記リンクへ移動して、あなたのウォレットのアドレスを入力してavaxを受け取ってください。 💁 アドレスはMetaMask上部のアカウント名の部分をクリックするとコピーができます。
🌅 window.ethereumを設定する
Webアプリケーション上で、ユーザーがブロックチェーンネットワークと通信するためには、Webアプリケーションはユーザーのウォレット情報を取得する必要があります。
これから、あなたのWebアプリケーションにウォレットを接続したユーザーに、スマートコントラクトを呼び出す権限を付与する機能を実装していきます。これは、Webサイトへの認証機能です。
window.ethereumはMetaMaskがwindow(JavaScriptにデフォルトで存在するグローバル変数)の直下に用意するオブジェクトでありAPIです。
このAPIを使用して、ウェブサイトはユーザーのイーサリアムアカウントを要求し、ユーザーが接続しているブロックチェーンからデータを読み取り、ユーザーがメッセージや取引に署名するよう求めることができます。
まずはwindow.ethereumを使用できるようtypescriptのコードを書きます。
📁 utilsディレクトリ
clientへ移動しutilsディレクトリを作成してください。
その中にethereum.tsというファイルを作成してください。
client
└── utils
    └── ethereum.ts
ethereum.tsの中に以下のコードを記述してください。
import { MetaMaskInpageProvider } from "@metamask/providers";

// window に ethereum を追加します。
declare global {
  interface Window {
    ethereum?: MetaMaskInpageProvider;
  }
}

export const getEthereum = (): MetaMaskInpageProvider | null => {
  if (typeof window !== "undefined" && typeof window.ethereum !== "undefined") {
    const { ethereum } = window;
    return ethereum;
  }
  return null;
};
typescriptでwindow.ethereumを使用するためには、windowにethereumオブジェクトがあるということを明示する必要があります。
コード内の以下の部分でwindowにethereumを追加しています。
MetaMaskInpageProviderは環境設定時にインストールした@metamask/providersから取得したethereumの型定義です。
declare global {
  interface Window {
    ethereum?: MetaMaskInpageProvider;
  }
}
また、getEthereum関数を呼び出すとwindowから取り出したethereumオブジェクトを取得できるようにしています。
📁 hooksディレクトリ
つづいてユーザがMetamaskを持っていることの確認とウォレットへの接続機能を実装します。
既に作成しているhooksディレクトリ内にuseWallet.tsと�いうファイルを作成し、以下のコードを記述してください。
import { useEffect, useState } from "react";

import { getEthereum } from "../utils/ethereum";

// useWalletの返すオブジェクトの型定義です。
type ReturnUseWallet = {
  currentAccount: string | undefined;
  connectWallet: () => void;
};

export const useWallet = (): ReturnUseWallet => {
  // ユーザアカウントのアドレスを格納するための状態変数を定義します。
  const [currentAccount, setCurrentAccount] = useState<string>();

  const ethereum = getEthereum();

  // ユーザのウォレットをwebアプリと接続します。
  const connectWallet = async () => {
    try {
      if (!ethereum) {
        alert("Get MetaMask!");
        return;
      }
      // ユーザーに対してウォレットへのアクセス許可を求めます。
      // eth_requestAccounts 関数を使用することで、MetaMask からユーザーにウォレットへのアクセスを許可するよう呼びかけることができます。
      const accounts = await ethereum.request({
        method: "eth_requestAccounts",
      });
      if (!Array.isArray(accounts)) return;
      // 許可されれば、ユーザーの最初のウォレットアドレスを currentAccount に格納します。
      console.log("Connected: ", accounts[0]);
      setCurrentAccount(accounts[0]);
    } catch (error) {
      console.log(error);
    }
  };

  // ユーザのウォレットとwebアプリが接続しているかを確認します。
  const checkIfWalletIsConnected = async () => {
    try {
      if (!ethereum) {
        console.log("Make sure you have MetaMask!");
        return;
      } else {
        console.log("We have the ethereum object", ethereum);
      }
      // ユーザーのウォレットへアクセスが許可されているかどうかを確認します。
      const accounts = await ethereum.request({ method: "eth_accounts" });
      if (!Array.isArray(accounts)) return;
      if (accounts.length !== 0) {
        const account = accounts[0];
        console.log("Found an authorized account:", account);
        setCurrentAccount(account);
      } else {
        console.log("No authorized account found");
      }
    } catch (error) {
      console.log(error);
    }
  };

  useEffect(() => {
    checkIfWalletIsConnected();
    // eslint-disable-next-line react-hooks/exhaustive-deps
  }, []);

  return {
    currentAccount,
    connectWallet,
  };
};
useWalletの処理を整理しましょう。
// ユーザアカウントのアドレスを格納するための状態変数を定義します。
const [currentAccount, setCurrentAccount] = useState<string>();

const ethereum = getEthereum();
はじめにユーザのウォレットアドレスを格納するための状態変数とethereumを用意します。
// ユーザのウォレットをwebアプリと接続します。
const connectWallet = async () => {
  // ...
};

// ユーザのウォレットとwebアプリが接続しているかを確認します。
const checkIfWalletIsConnected = async () => {
  // ...
};

useEffect(() => {
  checkIfWalletIsConnected();
  // eslint-disable-next-line react-hooks/exhaustive-deps
}, []);

return {
  currentAccount,
  connectWallet,
};
次に2つの関数を作成しました。
connectWalletはwebアプリがユーザのウォレットにアクセスすることを求める関数で、
この後の実装でUIにユーザのウォレット接続ボタンを用意し、そのボタンとこの関数を連携します。
そ��のため外部で使用できるように返り値の中に含めています。
checkIfWalletIsConnectedは既にユーザのウォレットとwebアプリが接続しているかを確認する関数で、
useEffectを使用してwebアプリがユーザのウォレットを使用する際には初回レンダリング時に確認するようにしています。
eslint-disable-next-line react-hooks/exhaustive-depsコメントについてcreate-next-appを実行した際に標準でeslintという静的解析ツールがインストールされています。eslint-disable-next-line react-hooks/exhaustive-depsは次の行を解析から外すことを指定するコメントです。 今回は useEffect の依存配列に関して、eslintのルールにそぐわないためそうしています。
また、それぞれの関数内で使用しているeth_requestAccountsとeth_accountsは、空の配列または単一のアカウントアドレスを含む配列を返す特別なメソッドです。
ユーザーがウォレットに複数のアカウントを持っている場合を考慮して、プログラムはユーザーの1つ目のアカウントアドレスを取得することにしています。
📁 layoutディレクトリ
ウォレットを使用するページ(今回は全てのページがそうです)のためにレイアウトを用意しましょう!
既に作成したlayoutディレクトリの中にRequireWallet.module.cssとRequireWallet.tsxを作成してください。
RequireWallet.module.cssの中に以下のコードを記述してください。
.wallet {
  padding: 0 0 10px 0;
  border-bottom: 2px solid #eaeaea;
}

.wallet p {
  margin: 10px 0;
}

.title {
  font-size: 20px;
}
RequireWallet.tsxの中に以下のコードを記述してください。
import styles from "./RequireWallet.module.css";

type Props = {
  children: React.ReactNode;
  currentAccount: string | undefined;
  connectWallet: () => void;
};

export default function RequireWallet({
  children,
  currentAccount,
  connectWallet,
}: Props) {
  return (
    <div>
      {currentAccount ? (
        <div>
          <div className={styles.wallet}>
            <p className={styles.title}>wallet: </p>
            <p>{currentAccount}</p>
          </div>
          {children}
        </div>
      ) : (
        <button className="connectWalletButton" onClick={connectWallet}>
          Connect Wallet
        </button>
      )}
    </div>
  );
}
引数として子コンポーネントとcurrentAccount、connectWalletを受け取っています。
currentAccount(ユーザのウォレットアドレス)がまだ格納されていない場合はConnect Walletというボタンを表示し、connectWallet関数と連携しています。
📁 pagesディレクトリ
最後に、これまでに作ったuseWalletフックとRequireWalletレイアウトを各ページで使用します。
pagesディレクトリ内の各ページを以下の実装に変更してください。
index.tsx
import type { NextPage } from "next";
import Link from "next/link";
import Layout from "../components/layout/Layout";
import RequireWallet from "../components/layout/RequireWallet";
import { useWallet } from "../hooks/useWallet";
import styles from "../styles/Home.module.css";
const Home: NextPage = () => {
const { currentAccount, connectWallet } = useWallet();
return (
<Layout home>
<RequireWallet
currentAccount={currentAccount}
connectWallet={connectWallet}
>
<div className={styles.container}>
<main className={styles.main}>
<h1 className={styles.title}>Welcome to Messenger 📫</h1>
<div className={styles.card}>
<Link href="/message/SendMessagePage">
<h2>send →</h2>
</Link>
<p>send messages and avax to other accounts</p>
</div>
<div className={styles.card}>
<Link href="/message/ConfirmMessagePage">
<h2>check →</h2>
</Link>
<p>Check messages from other accounts</p>
</div>
</main>
</div>
</RequireWallet>
</Layout>
);
};
export default Home;
ConfirmMessagePage.tsx
import { BigNumber } from "ethers";

import MessageCard from "../../components/card/MessageCard";
import Layout from "../../components/layout/Layout";
import RequireWallet from "../../components/layout/RequireWallet";
import { Message } from "../../hooks/useMessengerContract";
import { useWallet } from "../../hooks/useWallet";

export default function ConfirmMessagePage() {
  const { currentAccount, connectWallet } = useWallet();

  const message: Message = {
    depositInWei: BigNumber.from("1000000000000000000"),
    timestamp: new Date(1),
    text: "message",
    isPending: true,
    sender: "0x~",
    receiver: "0x~",
  };
  let ownMessages: Message[] = [message, message];

  return (
    <Layout>
      <RequireWallet
        currentAccount={currentAccount}
        connectWallet={connectWallet}
      >
        {ownMessages.map((message, index) => {
          return (
            <div key={index}>
              <MessageCard
                message={message}
                onClickAccept={() => {}}
                onClickDeny={() => {}}
              />
            </div>
          );
        })}
      </RequireWallet>
    </Layout>
  );
}
SendMessagePage.tsx
import SendMessageForm from "../../components/form/SendMessageForm";
import Layout from "../../components/layout/Layout";
import RequireWallet from "../../components/layout/RequireWallet";
import { useWallet } from "../../hooks/useWallet";

export default function SendMessagePage() {
  const { currentAccount, connectWallet } = useWallet();

  return (
    <Layout>
      <RequireWallet
        currentAccount={currentAccount}
        connectWallet={connectWallet}
      >
        <SendMessageForm
          sendMessage={(
            text: string,
            receiver: string,
            tokenInEther: string
          ) => {}}
        />
      </RequireWallet>
    </Layout>
  );
}
それぞれのページでは同じ実装を追加しています。
useWalletからcurrentAccount、connectWalletを取得し、RequireWalletレイアウトに渡しています。
🌐 ウォレットコネクトのテストを実行する
上記のコードをすべて反映させたら、ターミナル上で下記を実行しましょう。
yarn client dev
ローカルサーバーでWebサイトを立ち上げたら、MetaMaskのプラグインをクリックし、あなたのウォレットアドレスの接続状況を確認しましょう。
ウォレットを接続していない状態では以下のような画面が表示されるはずです。

Connect Walletボタンをクリックし、MetaMaskを接続してください。
⚠️ ネットワークにFujiを選択した状態で行ってください。
下図のようにMetaMaskからウォレット接続を求められますので、承認してください。
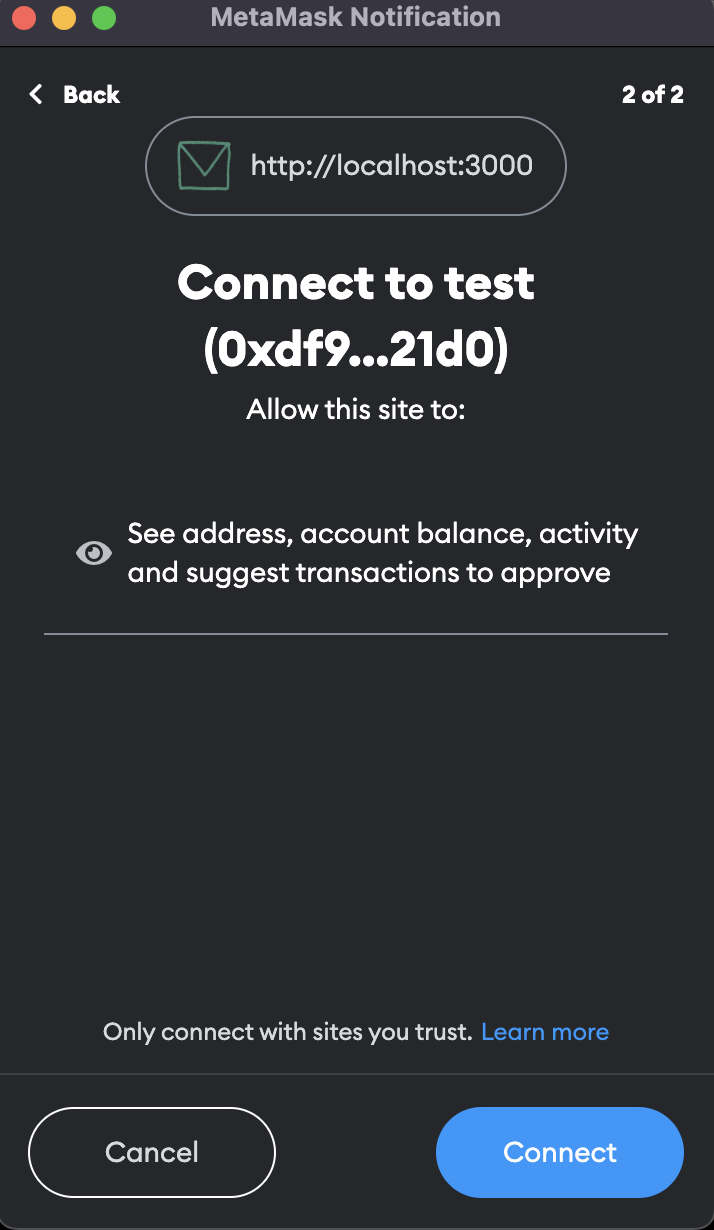
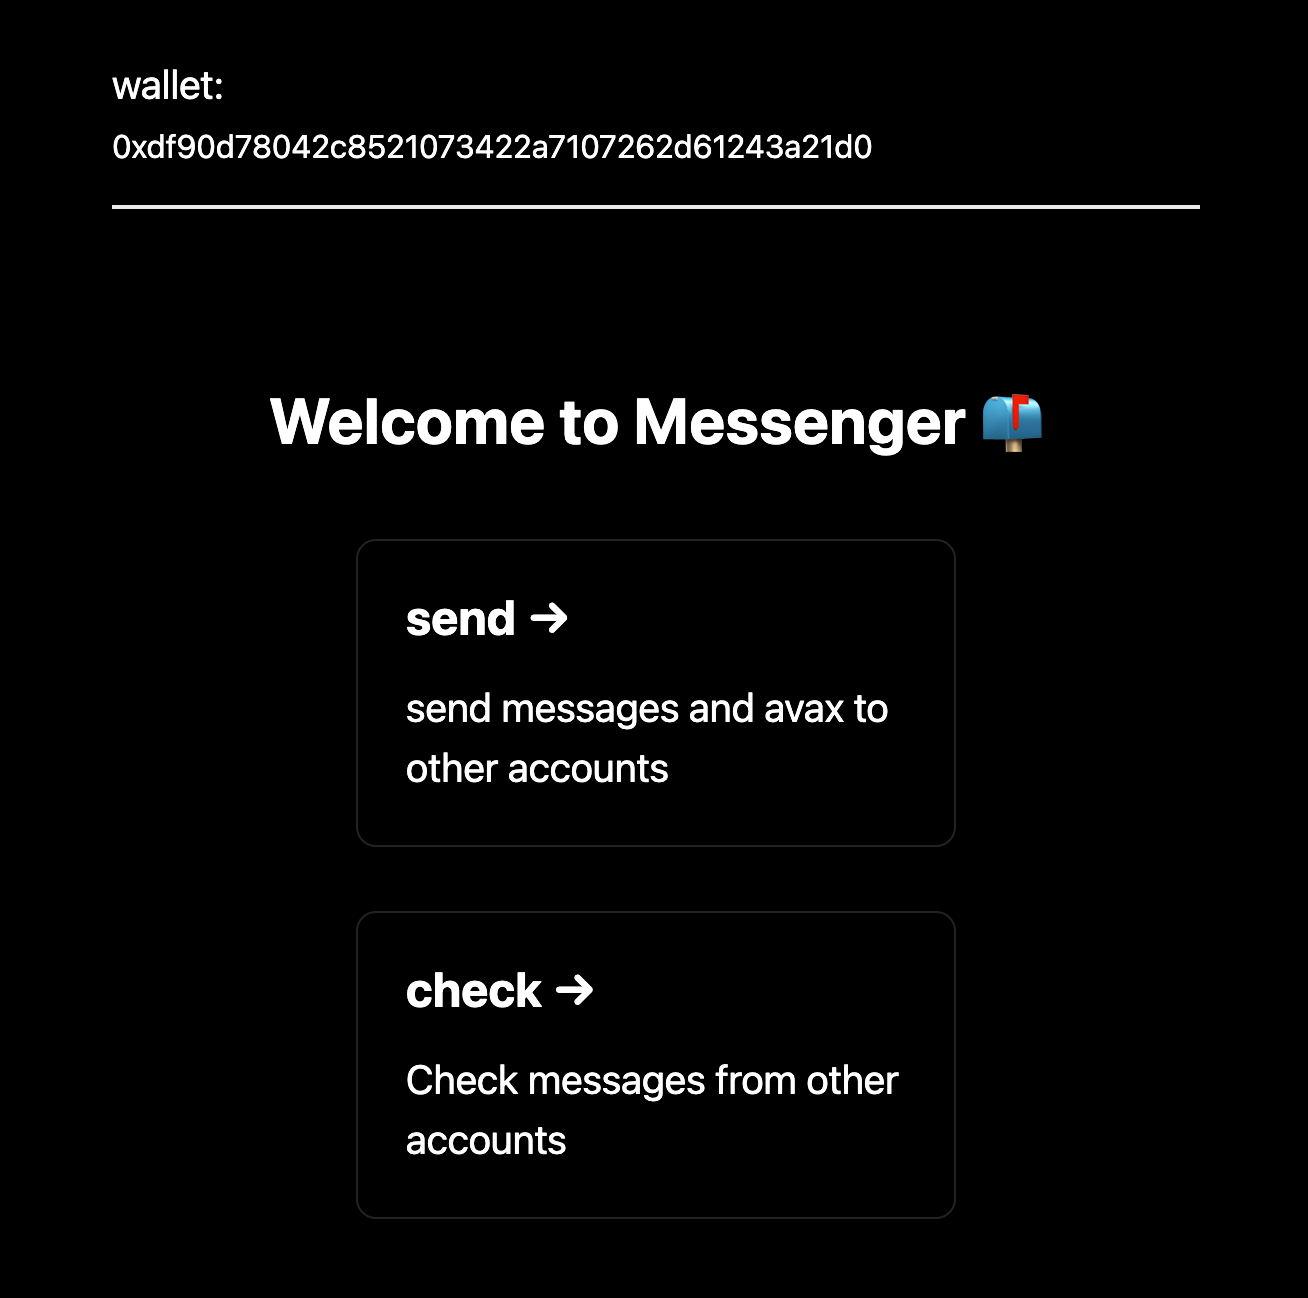
MetaMaskの承認が終わると、画面が切り替わり、画面上部にあなたの接続しているウォレットのアドレスが表示されます。
🌔 参考リンク
こちらに本プロジェクトの完成形のレポジトリがあります。
期待通り動かない場合は参考にしてみてください。
🙋♂️ 質問する
ここまでの作業で何かわからないことがある場合は、Discordの#avalancheで質問をしてください。
ヘルプをするときのフローが円滑になるので、エラーレポートには下記の3点を記載してください ✨
1. 質問が関連しているセクション番号とレッスン番号
2. 何�をしようとしていたか
3. エラー文をコピー&ペースト
4. エラー画面のスクリーンショット
ウォレット接続機能が完成したら、次のレッスンに進みましょう 🎉